This is a comprehensive guide on setting up a Safex Node/daemon (safexd) for solo mining on Ubuntu or Windows 10, and compiling a custom XMRIG build (donations removed) that allows solo mining of SFX to your local Node.
1. Why Run Your Own Safex Node?
-
Decentralization & Network Health
Each independent node maintains a copy of the blockchain. The more nodes that exist, the less vulnerable the network is to disruptions or control by a single entity. -
Control & Privacy
By running your own node, you don’t depend on third-party services to query balances or broadcast transactions. This reduces data exposure and ensures that no external entity can filter your transactions. -
Self-Sufficiency
You have immediate access to the network, maintaining your own verified copy of the blockchain. Wallet operations can be more direct and faster, since your node is locally available. -
Speed
It is so much faster to communicate with your own node, than with one located on a different continent. (For me, personally, the difference in latency is 380ms (safex mining pool/public node) vs 30ms (on my home LAN). This is particularly beneficial for syncing your wallet or getting jobs/sending block solves when mining (more on this later).
2. Safex Node Setup on Ubuntu
Follow the guide on Setting Up a Safex Node for Linux on the Safex Blog, or follow along below…
2.1 Requirements
- A PC that is Always On
- Ubuntu (or a similar Debian-based system)
- Sufficient disk space (the blockchain grows over time)
- A reliable internet connection
- A static LAN IP address, so that when you point your rigs to it, you know it will never change. If you need help with this, please see Step-by-Step Safex Cash Mining Rig Build and Setup: Linux/xmrig
2.2 Download safexd (Ubuntu Version)
-
Link to the precompiled binary:
https://github.com/safex/safexcore/releases/download/7.0.2/safexd-linux-7.0.2 -
Save the file (e.g.,
safexd-linux-7.0.2) into a directory on your system. - Mark the file as executable in the file property permissions, or open a Terminal window from the assigned directory and…
chmod +x safexd-linux-7.0.2
- (Optionally, rename it to simply
safexdfor convenience.)
2.3 Run the Safex Daemon
From the same directory where the file is located (and assuming you changed the filename to be simply safexd:
sudo ./safexd
The daemon will begin syncing the blockchain, which can take several days depending on hardware and connection speed. Once fully synced, you’ll see messages indicating you’re at the top of the chain (e.g., “SYNCHRONIZED OK”).
Once fully synced, type save (and then hit ENTER) in the daemon terminal window…
Then exit to stop the daemon.
We will now restart the Safex daemon to make it available for Solo Mining on your LAN.
2.4 Daemon Configuration Flags to Use
-
--rpc-bind-ip 0.0.0.0
Listen on a specific IP for RPC calls. By default, it’s localhost only.0.0.0.0allows connections from any LAN IP address on your home network. -
--confirm-external-bind
Required when binding to any non-localhost IP. This flag is a safety measure to prevent accidentally exposing your node to other users on the internet without explicit acknowledgement. -
--restricted-rpc
Helps secure RPC functionality if you open it beyond localhost.
Restart your node with the following command, and it will be ready for serving your mining rigs on your local network.
sudo ./safexd --rpc-bind-ip 0.0.0.0 --confirm-external-bind --restricted-rpc
You can now skip past the Windows Instructions and get into setting up a custom xmrig build for solo mining.
3. Safex Node Setup on Windows 10
Requirements
- A PC that is Always On
- Windows 10
- Sufficient disk space (the blockchain grows over time)
- A reliable internet connection
- A static LAN IP address, so that when you point your rigs to it, you know it will never change.
3.1 Initial Daemon Setup and Sync
See Setting Up a Node for Windows on the Safex Blog for the initial setup. Be sure to add the safexd.exe (or the folder where it is located) to your Antivirus Exclusion list.
3.2 Daemon Configuration on Windows
You can append flags in a similar manner to Linux. For example:
safexd.exe --rpc-bind-ip 0.0.0.0 --confirm-external-bind --restricted-rpc
You can do this in the Properties of the file itself…

…where you would simply add the flags in that top field where the filename appears.
OR
You could first create a shortcut to the file, and add the flags in the shortcut, as below…
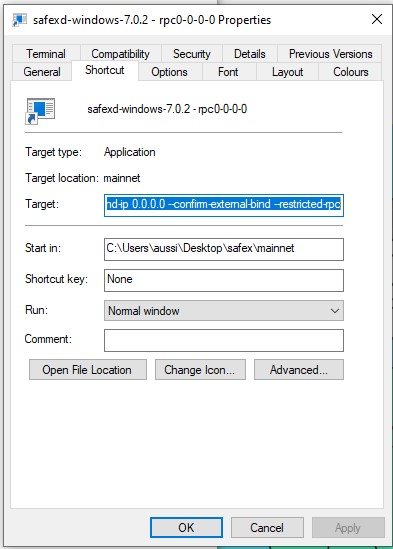
Whether you rename the file from safexd-windows-7.0.2 to simply safexd, or not, is entirely up to you.
Now when you startup the Node, It will kick off with those flags, and once synchronized, it will be ready to use for solo mining (and connecting your wallet to).
4. Solo Mining SFX using XMRIG software - IMPORTANT INFORMATION
Edit 8 May 2025: It seems there is an issue with these xmrig ubuntu build instructions. Errors have been encountered during the compile for a user on Ubuntu 24.04. My rigs are still on Ubuntu 20.04, and I got no errors. May I suggest you try using Ubuntu 20.04 - feedback would be appreciated.
The only version of XMRig that is compatible with solo mining SFX is version 5.4.0. This is the first version of xmrig that natively supported Safex mining. Later versions of XMRig introduced changes to the way they handle job templates, HTTP communication, and algorithm optimizations that are incompatible with communicating with the Safex node daemon directly, resulting in persistent errors such as “Block template not accepted” or “Block template error” during mining. These errors make solo mining impossible with any newer version.
As a result, only XMRig v5.4.0—without modifications to core behavior beyond donation removal—can successfully communicate directly with the Safex daemon and mine blocks reliably.
Support the Original Devs
If you remove the donation code, consider manually donating to XMRig’s devs if you find it useful:
https://xmrig.com/donate
5. How Solo Mining Differs from Pool Mining
In Pool Mining:
- Your miner submits many lower-difficulty shares that the pool uses to estimate your contribution.
- The pool adjusts difficulty dynamically to keep shares flowing at a steady rate.
- When the pool finds a block, rewards are distributed based on shares.
In Solo Mining:
- Mining difficulty is always the true blockchain difficulty
- Your miner only submits a share when it finds a full valid block at the true blockchain difficulty.
- This means very few accepted shares—only when a block is actually found.
- Instead of steady accepted shares (like in a pool), you will see rare but real block solves.
The critical component that allows newer versions of XMRig (eg. v6.x and beyond) to work with Safex in a pool mining context is a custom mining pool backend, specifically designed to:
- Translate modern Stratum protocol calls from newer XMRig clients into a form that the Safex daemon can understand.
- Generate valid block templates using the Safex daemon’s JSON-RPC interface.
- Validate shares, construct full blocks when valid work is found, and submit them to the node using the correct format.
This intermediary is typically implemented using a modified version of a Monero-compatible Stratum server. These pool servers act as translators and validators, ensuring:
- The newer XMRig miners (which speak newer Stratum protocol versions and expect modern formatting) can connect, mine, and submit shares.
- The Safex daemon (which understands older block templates and expects older submission formats) receives only correctly structured block data.
In solo mining, XMRig connects directly to the Safex node. If it’s a newer version, it uses incompatible RPC formatting, leading to errors like “block template not accepted.”
In pool mining, the pool server handles all the communication with the Safex node. The miners only talk to the pool using the modern protocol — they never interact directly with the node.
6. Changes for those currently Pool mining SFX
For those of you who are currently pool mining with rigs that were built in accordance with my Step-by-Step Safex Cash Mining Rig Build and Setup: Linux/xmrig article in the Safex Blog, the process of changing your rig setup is fairly straight forward.
For those of you who are using rigs running Dan’s SFXOS, I would recommend a minor hardware upgrade, namely, change from a USB stick to an M.2 SSD as the boot drive.
Upgrading from a USB stick to an M.2 SSD offers significant improvements in stability, reliability, and performance. USB drives are prone to slowdowns, data corruption, and premature failure under sustained load. By contrast, an M.2 SSD provides faster boot times, better I/O throughput, and a much longer lifespan, ensuring the system runs smoothly even during long mining sessions. (And you can’t accidentally bump an SSD as you tinker in the rig room - the USB stick protruding from the rear of the rig is far more susceptible to a knock.)
Upgrading is straightforward: the Ubuntu operating system can be easily installed onto the SSD, and the mining software can then be configured as needed. For anyone planning to solo mine Safex over the long term, moving to an SSD is a critical reliability upgrade, IMHO.
For those new to SFX mining, the rig specs in the link above would still be generally accurate, but you may want to look at the 5000-series CPUs, rather than the older 3000-series. That said, my dedicated SFX rigs are all 3900X CPUs and are still going strong after years of continuous 24/7 mining.
7. Choosing your OS: Ubuntu vs Windows 10
When it comes to cryptocurrency mining—particularly solo mining with XMRig—Ubuntu Linux is vastly superior to Windows 10 in terms of performance, reliability, control, and cost. Ubuntu is a free, open-source operating system that consumes far fewer system resources than Windows, meaning more CPU power and memory are available for mining rather than being wasted on background processes, telemetry, Cortana, automatic updates, and other unnecessary overhead. Windows 10, even when stripped down, still runs dozens of services that interfere with mining performance and responsiveness.
On top of performance, Ubuntu gives you full control over your system—such as huge page allocation and CPU affinity. Compiling and customizing mining software like XMRig v5.4.0 is straightforward on Ubuntu. Restarts for updates, driver popups, or user account control (UAC) prompts simply don’t exist on Ubuntu. It’s stable for months at a time, perfect for rigs intended to run 24/7 without disruption.
And of course, the cost difference can’t be ignored. Ubuntu is entirely free, while Windows 10 requires either a paid license or the hassle of running an unactivated version—with limited functionality, watermark overlays, and legal grey areas. Multiply that across multiple rigs, and the savings from choosing Ubuntu can be hundreds of dollars. For miners seeking maximum uptime, performance, configurability, and return on investment, Ubuntu is not just better—it’s the obvious choice.
All that being said, many of us, me included, have a Win 10 PC that you probably use for other activities, but you may want to set it to mining SFX when idle. So we’ll cover Ubuntu first - which is what every dedicated SFX mining rig should be using, but we’ll also cover the process of compiling a custom XMRIG 5.4.0 with Donations removed for the Windows users.
8. Creating a LINUX Custom v5.4.0 XMRIG build with Donations Removed
Assumptions:
- You have already successfully installed Ubuntu, made your XMP tweaks to your RAM profile, and enabled SSH for remote access, as explained in Step-by-Step Safex Cash Mining Rig Build and Setup: Linux/xmrig * Latest Ubuntu is no longer 20.04, as the old blog article suggests - however, only 20.04 seems to work for compiling the equally old v5.4.0 of xmrig. Do NOT use the latest Ubuntu release - only use 20.04.
- You have set a Static IP address for your rig, and written it down with the Ubuntu username and password you assigned to the OS when you installed it.
8.1 Prepare the System
If you have installed Ubuntu and set it up according to the blog article, you could use SSH to remote login and do the rest of the setup. BUT DO NOT DO THAT - while you still have the GPU, Monitor etc connected to your rig, compile xmrig as explained below
8.2 Prepare Ubuntu
Before building XMRig, ensure your system is up to date.
sudo apt update && sudo apt upgrade -y
sudo reboot
Install Required Dependencies
XMRig requires several libraries and tools to build successfully.
sudo apt install -y git build-essential cmake libuv1-dev libssl-dev libhwloc-dev
Explanation:
-
git→ Needed to clone the XMRig repository. -
build-essential→ Includesgcc,g++, andmake. -
cmake→ Required to configure the build. -
libuv1-dev→ Event-driven I/O library (required for network communication). -
libssl-dev→ OpenSSL libraries (for TLS support). -
libhwloc-dev→ Optimizes CPU affinity for better mining performance.
8.3 Clone the XMRig Repository and Checkout XMRig 5.4.0 Source
git clone https://github.com/xmrig/xmrig.git
cd xmrig
git checkout v5.4.0
8.4 Remove Donation Code
By default, XMRig donates 1% of mining time to the developers. This can be removed by modifying the source code.
Edit src/donate.h
sudo nano src/donate.h
Change:
constexpr const int kDonateLevel = 1;
constexpr const int kDonateLevelMiner = 1;
To:
constexpr const int kDonateLevel = 0;
constexpr const int kDonateLevelMiner = 0;
Save and exit (CTRL + X, then Y, then ENTER).
8.5 Compile XMRig
mkdir build && cd build
cmake ..
make -j$(nproc)
After compilation, the xmrig binary will be in the build/ folder.
8.6 Set Up the config.json File
Create the Working Folder and Move the Binary
mkdir -p ~/xmrig-solo
cp xmrig ~/xmrig-solo/
cd ~/xmrig-solo
Create config.json
sudo nano config.json
Paste/type the following:
{
  "autosave": true,
  "cpu": true,
  "opencl": false,
  "cuda": false,
  "huge-pages": true,
  "pools": [
    {
      "url": "192.168.200.230:17402",
      "user": "YOUR_SAFEX_WALLET_ADDRESS",
      "pass": "x",
      "keepalive": true,
      "tls": false,
      "algo": "rx/sfx",
      "daemon": true
    }
  ],
  "api": {
    "id": null,
    "worker-id": null
  },
  "http": {
    "enabled": false
  }
}
Replace 192.168.200.230 with the LAN address of your Local Safex Node/Daemon
ReplaceYOUR_SAFEX_WALLET_ADDRESSwith your actual address.
Save and exit (CTRL + X, then Y, then ENTER).
8.7 Run XMRig
Once your Safex Node in running - with the correct flags for local mining - then you can run xmrig via an SSH command from another PC on your Home network. This negates the need to have a GPU, monitor, mouse and keyboard plugged into each rig.
I found it most convenient to SSH into each rig from my Ubuntu PC running the Safex Node, which then allowed me to leave a terminal window open for each rig, to monitor xmrig mining. You could also use PuTTY via a Windows PC, if you prefer, as explained in the above-linked Rig Build blog article.
Here’s the simple, proper way to enable SSH in Ubuntu:
1. Install the OpenSSH server package:
Open your terminal and run:
sudo apt update
sudo apt install openssh-server
This installs the SSH server.
2. Check if SSH service is running:
After installation, Ubuntu should automatically start the SSH service. You can check with:
sudo systemctl status ssh
- If it says active (running), SSH is ready.
- If it’s not running, you can start it manually:
sudo systemctl start ssh
Enable SSH to start automatically on boot:
sudo systemctl enable ssh
Once you have the rig’s IP address and Ubuntu username/password, open a Terminal window and run:
ssh username@192.168.1.101
Replace username with the actual login username on the rig.
Replace 192.168.1.101 with the rig’s IP.
Authenticate
- If this is your first SSH login, it will ask:
Are you sure you want to continue connecting (yes/no)?
Type yes, then press ENTER.
- Then it will prompt for the password of the rig’s user account.
Enter the password and press ENTER.
You should now be logged into the rig.
cd ~/xmrig-solo
sudo ./xmrig
You should see jobs coming through from the Daemon, which is a sure sign that things are working and you are actively mining. Depending on your rig hashrate and luck, you should eventually see shares that get Accepted, which are Found Blocks.This could take many hours, or even days, depending on the hashrate of your rig, so be patient.
Repeat the above process for each of your rigs.
9. Creating a WIN 10 Custom v5.4.0 XMRIG build with Donations Removed
From my perspective, it s far more complicated compiling XMRIG 5.4 with Donations Removed for Windows, than it is for Ubuntu. If you aren’t up to the challenge, you could simply download one of the v5.4.0 xmrig builds from github and just sacrifice the 1% donation time.
However, for those who are interested, here are the instructions…
Assumption: you are compiling the xmrig build on the PC you intend to use it on. This is of particular importance if you use one of the high performance cmake flag options provided.
To build a Windows 10 version of XMRig with donations removed, you’ll need to:
- Set up a Windows development environment.
- Get the source code.
- Modify the donation level.
- Make a couple of fixes, to avoid errors during the build.
- Build the executable.
There are typically two main toolchains used to build XMRig (or most C++ projects) on Windows:
1. MSVC (Microsoft Visual C++) – Native Windows Build
- Toolchain: Comes with Visual Studio 2019 or 2022
-
Compiler:
cl.exe(MSVC) -
CMake Generator:
Visual Studio 16 2019orVisual Studio 17 2022 -
Build system:
.slnsolution files, uses Visual Studio IDE ormsbuild -
Result: Native Windows
.exewith best compatibility for Windows
Recommended if you’re using Visual Studio.
2. GCC / MinGW (Minimalist GNU for Windows) – Cross-Platform Style Build
- Toolchain: MinGW-w64 (installed separately)
-
Compiler:
g++.exe -
CMake Generator:
MinGW Makefiles -
Build system:
make -
Result: Windows-compatible
.exe, more Unix-like environment
Best if you’re comfortable with Unix-style builds or want command-line-only control.
The GCC/MinGW builds of XMRig can sometimes outperform MSVC builds in mining efficiency (especially on certain CPU architectures or for certain coins). This is mainly due to differences in:
-
Instruction tuning (GCC tends to be more aggressive with
-march=native) - Link-time optimization (LTO)
- Floating point math optimisations
- Thread management differences between POSIX-style and Windows-native APIs
As my Video Editing/3D Modelling PC is built on a Ryzen 5950X, I’ll be using the GCC/MinGW Build method in this guide.
While I’ll provide generic instructions for users who have other CPUs, I will also give some additional guidance for 5950X users - to tune GCC flags specifically for Zen 3 (znver3), which should allow you to extract the best possible hashrate.
9.1 Step-by-Step: Build XMRig with MinGW (GCC) on Windows 10
1. Install MinGW-w64 (GCC)
MSYS2 (Recommended)
- Download the installer: https://www.msys2.org/
- Install and run MSYS2.
- In the MSYS2 terminal, run:
pacman -Syu
Then close and reopen the terminal.
- Now install the build tools:
pacman -S git mingw-w64-x86_64-gcc mingw-w64-x86_64-cmake mingw-w64-x86_64-ninja
You’ll now have a working GCC-based build environment.
2. Open the “MSYS2 MinGW 64-bit” Shell
Don’t use the default MSYS2 shell — use the one labeled:
MSYS2 MinGW 64-bit
It sets up the correct environment variables for 64-bit Windows builds.
3. Clone XMRig Source Code
git clone https://github.com/xmrig/xmrig.git
cd xmrig
git checkout v5.4.0
4. Remove Donation Code
Use Notepad
- From inside the
xmrigfolder, run:
notepad src/donate.h
- If prompted to create the file (rare), double-check you’re in the right directory.
- When the file opens, look for this line:
constexpr const int kDefaultDonateLevel = 1;
- Change it to:
constexpr const int kDefaultDonateLevel = 0;
- Also change this line:
constexpr const int kMinimumDonateLevel = 1;
to:
constexpr const int kMinimumDonateLevel = 0;
- Save the file and close Notepad.
5. Code Fixes to Avoid Build Errors
Now, before we build, we need to make a couple of other adjustments, due to the age of v5.4.0. If we try to build it right now, we’ll run into a missing header file in XMRig v5.4.0: it’s using uint64_t without including the required <cstdint> header in a few places.
This is a known problem when building old XMRig versions with modern GCC compilers, which are now stricter. There are also a couple of other age-related issues we need to resolve, and the below edits overcome the problems.
Fix: Add #include <cstdint> Manually
We need to edit two files:
1. Edit src/base/net/http/HttpData.h
Open the file:
notepad src/base/net/http/HttpData.h
Find this section (near the top):
#include <string>
Add the following line directly under it:
#include <cstdint>
2. Edit src/base/net/http/HttpResponse.h
Open the file:
notepad src/base/net/http/HttpResponse.h
Same fix — find:
#include <string>
Add below it:
#include <cstdint>
Fix: Manually Link Dbghelp.lib in CMake
Step 1: Edit CMakeLists.txt
- Go to the root of your
xmrigsource directory. - Open
CMakeLists.txt:
notepad CMakeLists.txt
- Scroll to the bottom (or search for
target_link_libraries(xmrig). - Add the following line after the main
target_link_libraries(...)section:
target_link_libraries(xmrig dbghelp)
5. Configure CMake (Using Ninja) - Generic
Make a build directory:
mkdir build
cd build
Then configure:(See subsection 6 for alternative performance options)
cmake .. -G "Ninja" -DWITH_HWLOC=OFF -DWITH_OPENCL=OFF -DWITH_CUDA=OFF -DCMAKE_BUILD_TYPE=Release -DCMAKE_C_COMPILER=gcc -DCMAKE_CXX_COMPILER=g++ -DCMAKE_POLICY_VERSION_MINIMUM=3.5
6. Alternatives: Enable Max Performance Flags
For better hashrate, modify the build options:
cmake .. -G "Ninja" \
 -DWITH_HWLOC=OFF \
 -DCMAKE_BUILD_TYPE=Release \
 -DCMAKE_C_FLAGS_RELEASE="-O3 -march=native -flto" \
 -DCMAKE_CXX_FLAGS_RELEASE="-O3 -march=native -flto"
 -DCMAKE_POLICY_VERSION_MINIMUM=3.5
These flags do aggressive optimization, tailored to your CPU (-march=native) and enable link-time optimization (-flto).
6.1 Optimized MinGW/GCC Builds of XMRig
Recommended GCC Flags for Zen 3
Instead of -march=native, use:
-march=znver3 -mtune=znver3 -O3 -flto
These tell GCC to:
- Optimize for Zen 3 instruction sets.
- Use the best available instruction scheduling (
znver3). - Apply link-time optimization for aggressive code inlining and performance.
- Enable AVX2 and other Zen 3 specific instructions.
For Ryzen 5950X (Zen 3):
cmake .. -G "Ninja" \
 -DWITH_HWLOC=OFF \
 -DWITH_OPENCL=OFF \
 -DWITH_CUDA=OFF \
 -DCMAKE_BUILD_TYPE=Release \
 -DCMAKE_C_COMPILER=gcc \
 -DCMAKE_CXX_COMPILER=g++ \
 -DCMAKE_C_FLAGS_RELEASE="-O3 -march=znver3 -mtune=znver3 -flto" \
 -DCMAKE_CXX_FLAGS_RELEASE="-O3 -march=znver3 -mtune=znver3 -flto"
 -DCMAKE_POLICY_VERSION_MINIMUM=3.5
For Ryzen 3900X (Zen 2):
cmake .. -G "Ninja" \
 -DWITH_HWLOC=OFF -DWITH_OPENCL=OFF -DWITH_CUDA=OFF \
 -DCMAKE_BUILD_TYPE=Release \
 -DCMAKE_C_COMPILER=gcc -DCMAKE_CXX_COMPILER=g++ \
 -DCMAKE_C_FLAGS_RELEASE="-O3 -march=znver2 -mtune=znver2 -flto" \
 -DCMAKE_CXX_FLAGS_RELEASE="-O3 -march=znver2 -mtune=znver2 -flto"
 -DCMAKE_POLICY_VERSION_MINIMUM=3.5
➤ For Intel CPUs (modern, AVX2-capable):
cmake .. -G "Ninja" \
 -DWITH_HWLOC=OFF -DWITH_OPENCL=OFF -DWITH_CUDA=OFF \
 -DCMAKE_BUILD_TYPE=Release \
 -DCMAKE_C_COMPILER=gcc -DCMAKE_CXX_COMPILER=g++ \
 -DCMAKE_C_FLAGS_RELEASE="-O3 -march=native -flto" \
 -DCMAKE_CXX_FLAGS_RELEASE="-O3 -march=native -flto"
 -DCMAKE_POLICY_VERSION_MINIMUM=3.5
3. Build with Ninja
ninja
After a few minutes, you’ll have an optimized xmrig.exe in the build directory. You’ll probably want to move the xmrig.exe file to somewhere more convenient, for regular use. Just remember that wherever you move it to, you’ll have to add the location to your Antivirus Exclusion List.
I mention this again, below, in the Additional Tuning section, but it is imperative that you exclude xmrig (or the folder in which it resides) from your AV, to avoid it being quarantined.
Whatever folder you end up using for your xmrig file, you now need to add the config.json file. Use Notepad to create it: but don’t save it as a .txt file - you need to save it as a .json extension. If you already have a config.json from pool mining, you can simply copy it here and then edit it for solo mining, as below…
Paste/type the following:
{
  "autosave": true,
  "cpu": true,
  "opencl": false,
  "cuda": false,
  "huge-pages": true,
  "pools": [
    {
      "url": "192.168.200.230:17402",
      "user": "YOUR_SAFEX_WALLET_ADDRESS",
      "pass": "x",
      "keepalive": true,
      "tls": false,
      "algo": "rx/sfx",
      "daemon": true
    }
  ],
  "api": {
    "id": null,
    "worker-id": null
  },
  "http": {
    "enabled": false
  }
}
Replace 192.168.200.230 with the LAN address of your Local Safex Node/Daemon
ReplaceYOUR_SAFEX_WALLET_ADDRESSwith your actual address.
Save and exit
9.3 Additional Tuning
Once you’ve compiled XMRig with optimized GCC flags, you can squeeze even more hashrate out of it with system-level tuning and XMRig runtime options.
Here’s a breakdown of further performance tuning options, grouped by category:
1. XMRig Runtime Tuning Options
a. Windows setup:
- Run XMRig as Administrator (go into file properties and mark the checkbox). Huge pages will now be used, assuming you set it to true in the config.json (check the logs:
huge pages: 100%).
b. Disable Background Services:
- Kill unnecessary Windows processes that interrupt CPU load (e.g., antivirus, Cortana, etc.).
- Repeating for Importance: Add an exception for
xmrig.exein any antivirus software.
2. Windows 10 System-Level Tuning
a. Set Power Plan to High Performance
- Go to:
Control Panel → Power Options → High Performance
b. Disable CPU Sleep States (BIOS/UEFI)
- In BIOS:
- Disable C1E, C6, and Global C-States.
- Enable CPPC or Precision Boost Overdrive (PBO) if stable.
- Keeps CPU fully awake and boosts responsiveness.
Double click the xmrig file (or place a shortcut to it on your desktop, for convenience) and you should see jobs coming through from the Daemon, which is a sure sign that things are working and you are actively mining. Depending on your rig hashrate and luck, you should eventually see shares that get Accepted, which are Found Blocks.This could take many hours, or even days, depending on the hashrate of your rig, so be patient.
Repeat the above process for each of your Windows rigs.
That’s it. you should now be able to solo mine SFX to your own Safex Node from any Windows 10 or Ubuntu PC. Enjoy!
